Tuesday, 10 February 2015

Brief 1 - Week 3 Final Pages

A sum up of my final pages to finish Week 3!

Final Concept:


Final Materials:


Final Animation Reference:


Final Modelling Reference:


Done and done! Chill for a bit then on to modelling. So.. Hyped. :)

Progress shots incoming!


Watch this Space~

Brief 1 - Final concept +Blueprint.

Presenting my design for the Crescent Rose!

Final sheet! 


Pretty happy with how this turned out. Getting a better idea of how it's all going to link together. Excited!

Here's a blueprint, for modelling reference (cleared up the parts to get a better idea of each part):


Onto modelling now. Interesting.


Watch this Space~

Brief 1 - Material Referencing: Tester!

Testing, Testing.

Regarding the last post about referencing my textures, here's a few testers! And a few short comments...

Testing time

One-

Love the purple. It fits so well.
The black looks interesting.
The silver is the lighter variation.

The black and silver look well, the purple is maybe too bright..
 Two-

Same as one but with the darker silver texture. I like how this one works better then the first one. The darker edges help it come together better.
 Three-

The darker black texture! Darker yet lighter at the same time. I think this has a good feel to it, I could maybe use both blacks..
 Four-

Changing the purple, I love this colour! I'm loving how varied the tones are in this purple texture. It might work better then the first one if you ask me, with the grungy effect hmm..
 Five-

Lighter variation of black with the next purple texture! I don't think the black has enough texture on it to work with this purple and silver...
Six-

It's too light! The pinky purple texture doesn't fit AT ALL. Well, this ain't being used!


Materials, done. Animation Reference, done. Blueprints are next on the list.

Watch this Space~

Brief 1 - Material Referencing

Quick 'un for materials here.

Finding a purple metal.. Texture is hard, mkay. I have a few options for my basic colour scheme of black, silver and purple. I want to try them on a few test models to see how they look under lighting and what not.

Each texture is over 2MP in size each, 3 vary-ing purple textures, 2 black (black is harder then I thought..) and 2 iron metal texture for the blades and bolts.

Giant thanks to Lugher Textures for providing me with these. Mucho Danke. :)

Black


One-

I like this texture because of the gradient effect.  There's a slight highlighted area which could give a nice effect on a 3D model.


Two-

This one is a lighter hue then the first. It's not JUST black, which made me pick it over others. The red tints give a sense of a little.. Rust. Makes the model feel more metallic maybe?


Purple

One-

Rougher textures on this choice. Vibrant purple colour, not a lot of dark tones. This one really stands out. Ooo..
 Two-

A much darker texture. This one is like leather. The darkness on one side could be an issue but if it was cropped then it would be easier to use.

Three-

Rough and dark, so we'll have a light choice now. It looks smoky and fantasy-like. Depending on my metal texture, the lighter purple might be a better choice but right now it's not going to be top pick.


Silver

One-

A softer metal texture would contrast from the black texture, which gives a better balance in my opinion. If all the textures are dark then it might hide away a lot of the detail. Might get a bit confusing if they're all dark.

Two-

This one is harsher with darker tones in it. The bump map is heavier giving yet more rustic feels to it. But I think it could be a little heavy depending on the other choices.


Needa do testers on models! Another post, I'm afraid. Dinner time. :)

Blueprints up next, all ready to go.

Watch this Space~

Sunday, 8 February 2015

Brief 1 - Blue print count!

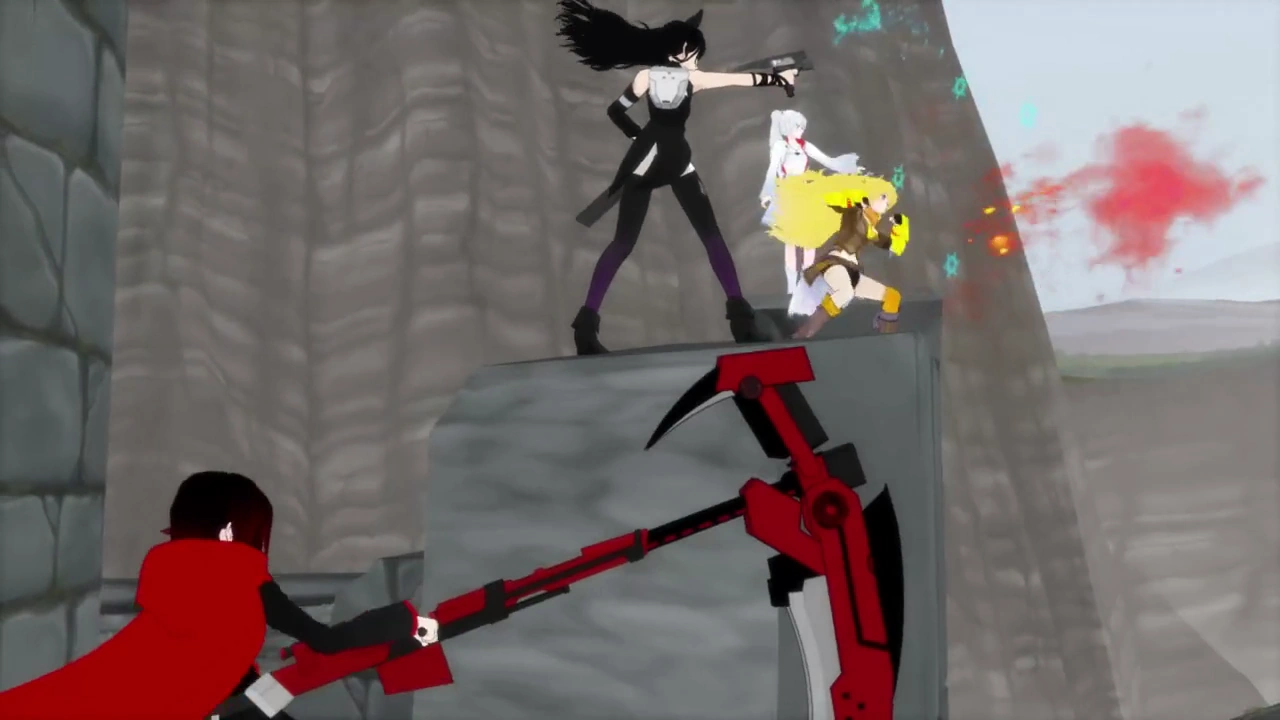
As I've mentioned, I'm gonna do Monty's RWBY "Crescent Rose", with a few colour adjustments...

This post will contain the Animation references and my final blueprints (assembled).

Instead of sketches I did a final blueprint version to reference while modelling.
A grand total of 33 pieces to model up, woo! It'll be fun to piece this up.

Without further ado, the sketches and the final bits! Blueprints for brief 1, go!

Sketching out the final form of transformation, this will be the base of blueprints.


Shape it up and number the parts, just a rough idea of numbers for now.

Add some colour. Looks so much better, I can define each part now. Jee. Little more.. Confirmed numbering too!

 Bit of.. Personal notes on how everything will rotate into each other to create the compact forms below.


Lastly, the compact and Gun forms! The final outcome of the
animation sequence.

Animation Reference
Using the Crescent Rose for a little reference in terms of animating the transformation. Compile them together and there we go, here's my page of reference. 

Spice it up with some views and lighting and boom. Epic Scythe.. Gun.. Dual.. Whatever.


Still gotta find Material references, and blueprint each part.. Fun times. Long blogs. :D

Watch this Space~

Week 2 Tutorial - Mechanic Claw Arm

Morning session is modelling, Afternoon is Animation. Evenly balanced for a busy, busy Friday..

Use as little poly's as possible, makes everything so much easier, considering the turbosmooth divides quads into 4 more parts so.. Smooooth.

Oo, The Claww.. For week two, we spent like an hour actually modelling a rotating claw arm. Then moved onto Animating it and making it move. Weirdly, the longest part was getting the materials right, but that's because I'm a perfectionist.. Needa scrap that up if I'm finishing this up on time. Hah.

Well, I'll leave the video here, with a material fade though..


More to come, there will be some more updates on my Brief. But for now, hang tight.

Watch this Space~

Week 1 Tutorial - Bouncing Ball

Up until this point we hadn't really used the animation feature of 3DS Max, we knew it was there but how to work it and all? Nope. Not a chance.

3D Animation is what makes the world go round in the modern age so the hype for getting deeper into it was.. Unreal.

Something simple for the first week: A bouncing ball.

Making the sphere bounce and deform as the keyframes went on. Using the Curve editor to have an idea of how the object moves over the 100 frames, and edit it a lot easier..  We also created a hierarchy to group up two eyes onto out main ball - so they moved at the same keyframe the body did. A little.. Squishy orange. How cute.

As a little bit on the side, we did aligning a line to a dummy in order to make a pendulum. Trust me, it might sound Meh but it's a warm up for beginners huh? :)


It's a small thing but here's a short video of the outcomes:


More to come, don't worry~

Watch this Space~

Friday, 6 February 2015

Brief 1 - Research

Onwards with Development!

Update:
Gun mechanics - How Guns Work

Crescent Rose.. My burning passion for like 2 years now. I wanna make her my own~

Much Respect to Monty and hopefully I can do you proud. :3

Researching the Crescent Rose came back with the following technical details:

It's collapsible frame allows it to transform between three different modes:


  • A storage mode: it's most compacted form where it can be condensed for travel convenience

  • A rifle mode: where it takes the form of a medium length bolt action rifle. In this form the absence of the scythe makes for more effective use of the rifle component

  • A Scythe mode: It's most expanded form. Where it is fully extended into the form of a scythe. Allowing it to be used as a mid-to-close range bladed melee weapon. This form also doubles as a long range barrel sniper rifle for more precise, long range, high energy shots without giving up the melee capabilities of the scythe. If needed, the bottom of the shaft can unfold to add more cutting power in a close range fight.


Along side, this information there is a formal video on youtube of how the Crescent Rose transforms. Best Reference.. Ever~ Check it out:


Other references I found include blueprint sheets, and how other people have drawn the scythe - to get an idea of different perspectives


Though, I don't want to be copying other peoples work on this beautiful weapon. I'll watch through the series again and capture any unique views and shots I think will help me out! That's another post for another time.

Watch this Space~

Brief 1 - Concepts: Futuristic Weapons

Concepts and Sketches time, part 2

These next few posts will be about my initial ideas for each of the themes. As I mentioned before, I usually just stick with one idea and see it through but as I go I get more and more anxious about how it's turning out. Hopefully by doing it this way I can smooth out any finer details along the way. Proving to myself that the path I take at the end will give the better result! Feels like a 12 week long test..

Without Further a do, this post if about Futuristic Weaponry!

Concepts
As I mentioned in my first post, my heart was set on the idea of a Rifle that transforms into a Scythe (Monty Oum's RWBY), still being able to use the trigger action from the Rifle in Scythe mode, yet not being bulky. It's a stylish and practical design and I'm really looking forward to putting my twist on the Crescent Rose!

Before that though, what designs can I create?


Watch this Space~

Brief 1 - Concepts: Steampunk

Concept and Sketches, part 1.

"These next few posts will be about my initial ideas for each of the themes. As I mentioned before, I usually just stick with one idea and see it through but as I go I get more and more anxious about how it's turning out. Hopefully by doing it this way I can smooth out any finer details along the way. Proving to myself that the path I take at the end will give the better result! Feels like a 12 week long test.."

Introducing Steampunk~

Concepts
Steam punk is an interesting topic but to actually get that same rustic feeling is the difficult part.

Firstly, what is Steampunk? Time for research just to get a clearer idea.

Steampunk is basically a combo of Science Fiction and Fantasy literature. Over time it developped into a craft and lifestyle movement. It's mostly tied to the idea of Steam-powered machinery. Metal and wooden structures play a major part. Cogs and building up different mechanical structures seem to be the basics of it.

I tried to give it a go, focusing on how I could create iconic animal shapes using the Steampunk Style. With a slight look into the mechanics.. In conclusion, I found that Steampunk wasn't giving me the feel I was looking for so I will stay with Futuristic Weaponry.


Thursday, 5 February 2015

Brief 1 - Intro to the Themes.

I was really looking forward to what this module had in store for me, and after the first week I've only got more hyped up over it. We did a simple bouncing ball tutorial and worked with simple animation in 3DS Max and I felt like I had learned a lot. (Sounds a little crazayy..) But, this blog is about my briefs!

Brief One will be more focused on Rigid Body structures compared to Soft Body (Characters, in Brief 2...) and our themes consisted of: Steampunk, Futuristic Weapons, Cartoon Vehicles, and Product Assembly.


While we looked at some examples of each type, I started to create some ideas of my own for the two themes that were standing out most: Futuristic Weapons and Steampunk!


Approaching this brief I want to have a more varied start before narrowing down a certain path, compared to the past where I have one idea and I focus in on it without thought for anything else. Over the past week I feel it has helped me a fair bit with various concepts which I want to discuss below. Preparation for Week 3's presentation...


Steampunk

This theme took my interest mostly. I love the steampunk style of weaponry, and I see a lot of cosplays that fit in with this. I love the emotion you can get from this theme. I really enjoy seeing different peoples concepts on it. What they can create from how they see that particular scene.


I wanted to get a specific.. Rustic, complex look but simple feel? To my ideas around the steampunk theme but I don't feel that I quite captured that. Looking back, maybe I'm trying to think too deeply into it. I should try some more research before I finalise my idea. My initial sketches didn't strike me with the typical Steampunk feel so I think I'll try to research some more into the mechanics before I give up on this idea.


For the Steampunk, I liked the idea of Steampunk Animals, like clockwork. A hummingbird, a horse or a feline of sorts seemed to have captured my mind here. Vehicles didn't bring a lot to mind, unfortunately because I would have enjoyed trying to concept for the 3 themes, so I had more to choose from.


I also wanted to try and combine the first and second idea together: A Steampunk Futuristic Weapon? Not sure how exactly that works...


In terms of general weapons, I loved the idea of a Bow, or a Gun, mixed with metal and wooden steampunk styles. I have a few concepts that I can post up when I get my scanner back! :(


Futuristic Weapons

The first thing people think of for this topic is usually.. Guns. Moving turrets and little.. Scuttling creatures that lock on and fire on demand without much human input. Mass war without any effort, isn't that exciting...

But, whenever I saw this note I was immediately reminded of the RWBY series by Rooster Teeth's Monty Oum (RIP Monty, Keep Moving Forward <3). Red White Black Yellow, is an anime series in which each character has their own unique weapon. Rifles that turn into a Scythe. Gauntlets that can fire bullets at a reflex trigger. A rapier with integrated magic that's in tune with it's users emotions. A shotgun Hammer. There's so many! I love the series with all my heart.


I would love, LOVE to recreate the Rifle Scythe in RWBY. It's an absolute dream and I have so many ideas I would love to put into it! However, with the recent passing of Monty I want to respect his work so I need to think of another way around the Rifle Scythe and how it would transform and trigger.


Aside from the Scythe, the idea of a Bow also seemed interesting. Hawkeye's bow would be a great example here. He can flick it out to a full size ready for use any time anywhere. Convenient and practical. Nice.


Product Assembly

This was an interesting theme, when I looked at it in a bit more depth. Something that shows how technical your skills can get. I feel a Product Assembly brief would literally be like a show reel. Showing off how good you are, nothing wrong with that.. (We all need a bit more confidence!)

However, I didn't feel like this was the theme for me. It doesn't really fit in with my style of things, but it definitely would be interesting and it wont stop me trying a few concepts that's for sure!


Cartoon Vehicles

I have no idea at all how to even start with this particular theme. Not a clue! I've been trying to avoid this one as much as possible. The idea of how wise spread it can be and my lack of interest in vehicles just made it into a quick 'Nope' topic. Sorry Mitsubishi!

If I had to come up with an idea I would love to do something like a modern or futuristic Trojan Horse from that old Greek story of war in Troy. Otherwise... Nothing. :(


Well, that's the introduction. I have some ideas to concept out before I choose my final path. I'll post up some separate posts with quick sketch pages for my ideal themes... 


Watch this Space~